
How to Make Kombucha First Fermentation (F1) – Part 1 Of 3
Are you ready to brew your first batch of kombucha? Get started here with our first part of the guide: How to make kombucha first fermentation (F1).
We created this quick-start guide to help you get brewing some booch as fast as possible. This guide is broken up into three easy-to-follow articles that will take you from starting a new batch of kombucha to enjoying the final bottle of your fizzy, delicious drink!
We will teach you the “batch brew” method, the most common brewing method used by kombucha homebrewers.
To make kombucha, you are essentially letting sweet tea ferment. This process can be divided into two parts: the first fermentation and the second fermentation.
This article belongs to our 3-part series on how to make kombucha at home.
Page Contents
First Fermentation (F1)
This stage usually lasts between 6-12 days.
F1 is what turns the sweet tea into kombucha. At the end of F1, your kombucha will be mostly uncarbonated and unflavored.
Second Fermentation (F2)
To add carbonation and flavors, most home brewers let their kombucha undergo a second fermentation.
During F2, you can add fruits, juices, herbs, and other flavoring ingredients to sealed, airtight bottles at room temperature anywhere from 2-6 days.
This article will walk you through the first fermentation process using a 1-gallon glass jar. Ready? Let’s get brewing!
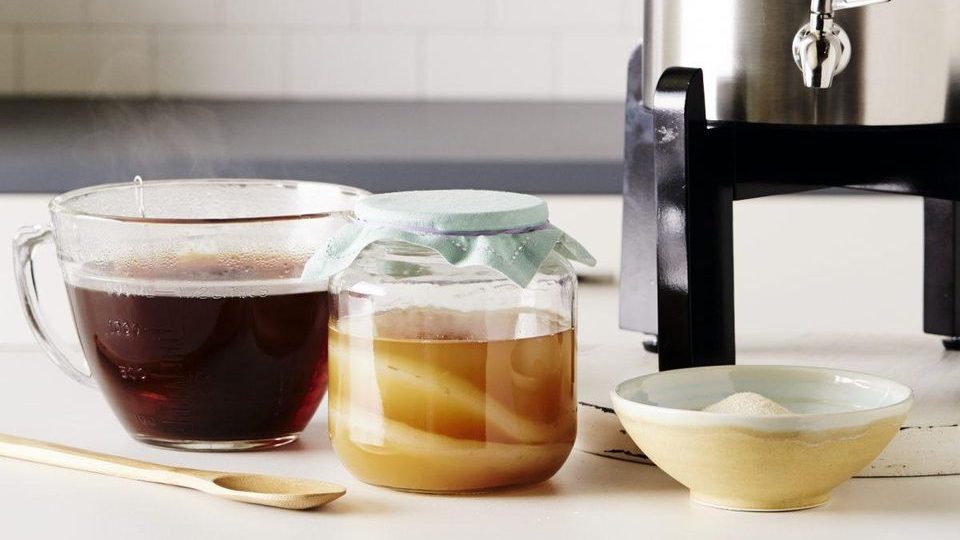
Ingredients for the First Fermentation
Water
- 4 cups of boiling water + 8 cups of room temperature or cold water
- Use filtered water. Tap water is fine, as long as it’s free of chlorine.
Tea
- 3 tablespoons of unflavored, loose-leaf black tea (organic, if possible!)
- You can use packets of tea if you prefer, but we recommend loose-leaf. 9 bags = 3 tablespoons.
- Stay away from flavored teas or herbal teas.
Cane Sugar
- 3/4 cup of cane sugar (organic, if possible!)
- Do not use other types of sugars or sugar substitutes for your first batch. If you are concerned about sugar content, remember that the yeasts will eat most of the sugar during the fermentation process. The sugar is more for them than for you.
A SCOBY (Symbiotic Culture Of Bacteria and Yeast)

- It’s important to use a quality SCOBY.
- We recommend purchasing one online from a reputable source or asking one from a friend who brews kombucha.
- (You can also grow your own SCOBY, but it will take about a month!)
Starter Liquid
- 1.5 cups of starter liquid (AKA unflavored kombucha that has gone through F1)
- Usually, starter liquid is sold with SCOBYs (including the link we provided for a quality SCOBY)
- If you don’t have enough, you can use unflavored store-bought kombucha. Look for the words “raw” and “original” on the bottle. Verify the ingredients on the nutrition label and make sure there are no fruits, juices, or herbs included.
- Some recipes call for vinegar. Never use vinegar.
Supplies for the First Fermentation
- Two regular pots
- Strainer
- 1-gallon glass jar
- Thermometer
- Breathable cloth cover (Pick anything that lets air through but keeps out insects. We like to cut up old cotton shirts, but coffee filters or bandanas work too.)
- Rubber bands
Before getting started, make sure you sanitize all the equipment that will come into contact with the SCOBY and starter liquid.
For now, this includes the 1-gallon glass jar and any nonmetallic utensil you choose to stir the liquid (stainless steel is safe to use!).
The best way to do this is to use boiling water.
Avoid anti-bacterial soap, as any residue not completely rinsed may kill the good bacteria in the SCOBY, resulting in a bad batch.
Instructions for the First Fermentation
- Bring 4 cups of water to boil in a pot. Once boiling, turn off the heat and add the tea. Cover with a lid and let the tea steep for 15 minutes.
- While the tea is steeping, add 8 cups of cold or room temperature water to the 1-gallon glass jar. This will help bring down the temperature when you add the hot tea concentrate later.
- After the 15 minutes have passed, strain the tea concentrate into the other pot, removing all leaves and stems.
- Add cane sugar into the hot tea concentrate, stirring well to dissolve everything.
- Pour the sweet tea concentrate into the glass jar and wait until you are within 68-86ºF (20-30ºC). Before adding the SCOBY and starter liquid, the temperature must be between this range. If it’s too cold, the SCOBY will go inactive. If it’s too hot, the SCOBY will die. It’s important to have the bacteria and yeast function properly to acidify your brew and help prevent mold. If they are inactive or dead, this won’t happen.
- Add the starter liquid and SCOBY. You can use your bare hands to handle the SCOBY… just make sure they are clean!
- Place the cloth cover over the mouth of your brewing vessel and secure it with a rubber band, creating a tight seal.
- Place your jar in a location with good airflow and away from direct sunlight. Pick a spot with temperatures ideally between 75-84ºF (24-28ºC), but anything 68-86ºF (20-30ºC) will ferment without problems. Remember that the fermentation will happen quicker at higher temperatures and slower at lower temperatures.
- Sit back, relax, and don’t touch the jar for 5 days! Really, don’t touch it. (We’ll explain why below.)
What to Expect During the First Fermentation
While you are waiting for your kombucha to go through its first fermentation, several things will happen.
It’s important to remember that you are dealing with a fermenting drink filled with live microorganisms.
No two batches are exactly the same or look, taste, or smell equal.
Kombucha is a hardy beverage and usually ferments without problems, especially if you follow the tips in this guide! Don’t be scared of mold… it’s very uncommon!
Here’s what you can expect to happen during F1:
- When you drop in the SCOBY, it tends to float to the top after a few days. However, if it sinks or hangs out on the side of the vessel, that’s also normal!
- After a couple of days, the top of the liquid will start to get filmy with white or translucent spots. This is what we call the “baby” SCOBY forming. After a few days, it should grow in thickness. If you move the brewing vessel before it has fully formed, this can interrupt its growth. This is why we recommend waiting at least 5 days before tasting the brew.
- Brown, stringy particles are normal. These are the yeasts, and they tend to attach to the SCOBY and hang down. Yeast deposits will also accumulate at the bottom of the jar.
- Black specks are also a common sight. If you missed a few bits of tea when straining, they may get caught in the SCOBY or float around in the brew. Again, don’t be concerned about this.
- The baby SCOBY that forms may be translucent, white, white-ish, or white/brown. It may be broken, with holes, or completely smooth.
- The brew will smell less like sweet tea and more like vinegar over time. It also will taste less sweet as the yeasts consume more of the sugar with time.
- The color of the liquid will get lighter as the bacteria feed on the tannins in the tea. Tannins are part of what gives tea its dark color. Additionally, the brew will get cloudier as the yeasts reproduce.
- The acidity of the brew will increase (resulting in a lower pH). Kombucha normally has a pH of 2.5-3.5.
Do you see something that wasn’t described above and are worried it’s mold?
Mold is usually white, green, black, or blue, and it always grows on the surface. If you see circular, fuzzy spots that fit this description, you may have mold. This is extremely rare.
If you are still concerned, send us an email with a picture to info@makebooch.com. Feel free to ask any other questions as well. We are here to help you!
What’s next?
For now, you need to let your booch do its thing and go through the process of fermentation.
After 5 days, we recommend tasting the kombucha daily to see if it’s ready for F2. How can you tell if your kombucha is done fermenting and ready to be bottled?
Part 2 of this series will help you decide just that!
Congrats! You just started your first batch of homemade kombucha!
Next: How to Make Kombucha (Part 2 of 3) – When is Kombucha Ready to Bottle?